Publications. Publications 1c creation of a printed form layout
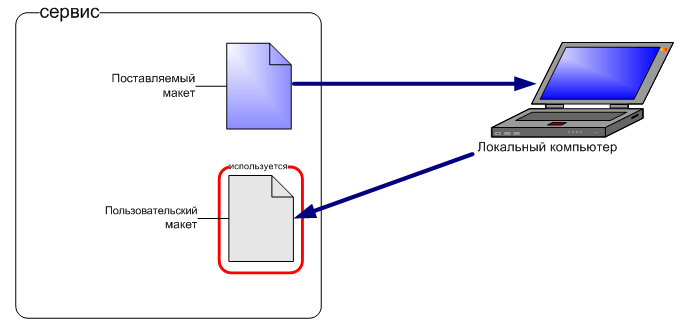
It is carried out in accordance with the standard layout of the printed form built into the application by the developers (this is called the “delivered” layout).
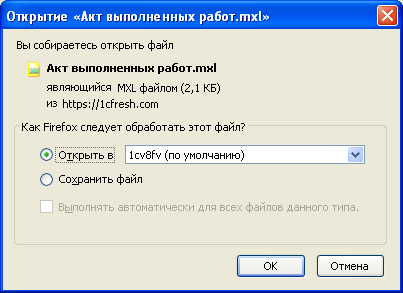
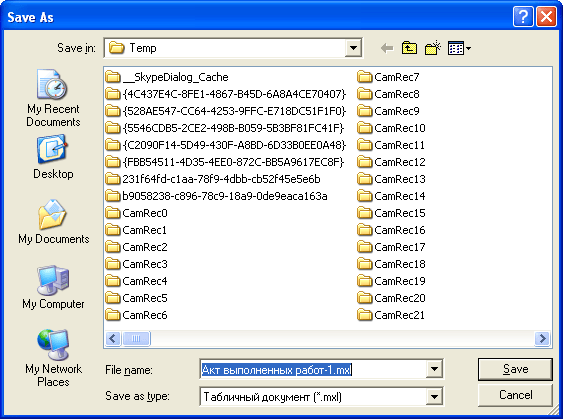
If necessary, you can change the standard layout and, in the future, print a document based on your personal (“custom”) layout. To edit the layout of the printed form, a mechanism is provided for uploading to a local computer. Editing the layout is carried out in the local version of the 1C:Enterprise system application (in particular, you can use the free 1C:Enterprise - Working with Files application).
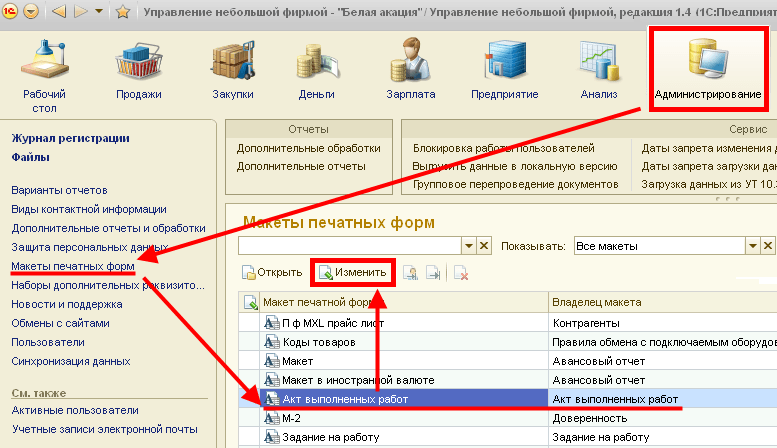
To change the printable layout:
Editing the layout of the printed form is completed; when printing the document, the layout to which the changes have been made will be used.
If you want to return to the previous printable layout, click the button Use standard layout. In this case, the edited layout will still be present on the server, and it can be turned on again by pressing the button Change.
We wish you pleasant work!
How to insert a company logo into a printed form layout?
Here is a specific example of editing a printed form layout Invoices for payment, namely, we will consider how to insert an image into it, for example, a company logo (this image must first be prepared and saved as a graphic file, for example, in png or jpg format).

Thus, now the invoices that you prepare for transfer to your counterparties will contain your company logo. In order to add a logo to other documents, you will need to repeat the described steps for the corresponding printed forms of these documents.
We wish you pleasant work!
This article will tell you in detail how a beginner with little knowledge of 1C 8 can create a printed form. For example, let's take one of the most common 1C 8 configurations - Accounting 2.0. Creating a printed form 1C stages of writing:
- Creating an external printing form file;
- Creation of a printed form layout;
- Writing program code to display printed form data on the screen;
- Creating parameters for auto-registration of a printed form;
- Connecting an external printing form to the base 1C Enterprises.
Creation of a printed form 1C. Formulation of the problem
We are required in the configuration Accounting 2.0 create a printed form for a document Receipt of goods and services. In the header of the printed form, display the following data:
- Organization;
- Counterparty;
- Counterparty agreement;
- Date of receipt.
Display the data in the tabular section as a table Goods document. The table should include the following columns:
- Nomenclature;
- Quantity;
- Price;
- Sum;
- And also the price of the item for the current date (by type of price from the document).
External processing file
Let's move on to solving the problem. First, let's open 1C 8 in mode Configurator. It is in this mode that all developments are carried out on the 1C 8 platform. Now we need to create an external processing file. To do this, click on the menu File -> New… or by the icon of a new file.
In the window that opens, select the item External processing.

Next in the field Name You must enter the name of the external processing. In our case, we’ll simply call it “PrintForm”; the synonym field will be filled in automatically. Please note that in the field Name, external processing, the name should be written without spaces or punctuation marks.
Let's add external processing attributes LinkToObject and select type for him DocumentLink. Receipt of Goods and Services. To do this, in the 1C external processing metadata tree, select the item Requisites and press the button Add(button with green plus). The attribute properties window will open on the right side of the screen, in the field Name let's write - ReferenceToObject. IN field Type press the button with three dots.

Let's expand the branch in the type tree DocumentLink, and find the element Receipt of Goods and Services there, check the box next to it and click OK.
Let's save the external processing file to the hard drive; to do this, use the menu File -> Save, pictogram Save(blue floppy disk), or a keyboard shortcut Ctrl+S. Let's name the saved file “PrintedForm”.
Creating a printed form layout
Let's start creating a layout of the 1C printing form. The layout serves as a template for the output of the printed form, so if you want your printed form to look good, you should pay attention to it.
Let’s add a new layout in the external processing metadata tree; we won’t change anything in the layout designer window and click the button Ready.

In the new layout that opens, we will create several areas necessary for displaying the printed form. All the layout areas we need will be horizontal, so to create a new area, select the required number of layout lines and go to the menu Table -> Names -> Assign name or use keyboard shortcut Ctrl + Shift + N, then enter the name of the region in the box. When creating a layout area, don’t be afraid to make a mistake with the number of lines; you can always add or remove them. To delete a 1C layout line, select the desired line and select the item in the context menu Delete. To add a new line to the layout, select any line of the layout and select the item in the context menu Expand.
Adding a Layout Header
First of all, let's create an area A cap, it will display the data for the header of the printed form. For this area we will need seven layout lines. Let's select them and, as I wrote above, press the key combination Ctrl + Shift + N, in field Name write “Hat” and press the button OK.

Let's fill the layout area with the data we need. Usually, no printed form is complete without a title, so let’s create one in our layout header as well. Since in the title, in addition to the name of the printed form, we will also display the number of the document from which it was printed, we will set the text of the title in the layout as a parameter. A layout parameter is a specially designated layout cell into which various data can be output using the built-in 1C 8 language. The title should be displayed across the entire width of the printed form, so let’s decide how many layout cells will be enough for us to print on a standard landscape orientation of the sheet.
Usually thirteen or fourteen layout cells are enough, select them in the first row of the area A cap and combine into one cell ( Context menu -> Merge). After this, double-click on the resulting large cell and write the name of the parameter, in our case “TitleText”. In order for the entered text to become a full-fledged parameter, right-click on the cell and select the item in the context menu Properties. On the bookmark Layout let's find the field Filling and select the value Parameter. Parameters in the 1C layout are indicated by brackets “<>».
The heading of the printed form should stand out among other text, so select the cell again and use the icons on the layout formatting panel to set the text alignment Centered and font size 14.
After the title text we will display it in the area A cap information about the organization, counterparty, counterparty agreement and date of receipt of goods. Since all this data is also taken from the document, we will also formalize it with parameters. In addition, before each parameter you should write explanatory text so that the user can easily understand where the organization is, where the counterparty is, etc. All these actions are similar to creating a title, so I won’t dwell on them in detail, I’ll just give a picture of what should happen in the end.
The figure shows how the layout parameters differ from regular text.
Adding a Layout Table Header
The last thing we need to create in this layout area is the table header, into which the data of the tabular part will be displayed Goods. The columns required for the table were described in the “Problem Statement” section. We will also create a table header using a combination of cells and writing text (column names). Select the borders of the table header using the tool Frame, which is located in the layout formatting panel.

Adding a table to a layout
Let's create another area in the layout - Data. The data table of the tabular part will be displayed in it Goods. For this area, we only need one line of layout. To display all the rows of the tabular part in a printed form, we will fill and display this area the required number of times. Columns in the area Data should coincide with the columns of the table header, so filling it out will not be difficult. The only difference is in the area Data we need parameters, not just text. Also note that by default, numeric parameters are formatted to the right and text parameters are formatted to the left. To select columns, you also need to use the tool Frame.
Adding a Footer to a Layout
The last layout area we need is Basement. It will display totals by quantity and amount. Creation is similar to creating an area Data, but additionally the results should be highlighted in bold.
The end result should be a layout that looks like this:

Creation of a printed form 1C. Programming
Let's start programming - this is the most important stage in creating a printed form. First of all, let's go to the external printing form object module, this is where we will program. To do this, in the main external processing window, click Actions -> Open object module.

You need to create an export function in the external printing form object module Seal().
Function Print() Export EndFunction
Please note that this feature is required for external printing forms in configurations using the regular application. All subsequent program code necessary to display the printed form will be written inside this function.
Initializing Basic Variables
Let's create a variable TabDoc, which will contain a spreadsheet document - this is exactly the printed form into which we will display the filled areas of the layout.
TabDoc = new TabularDocument;
To a variable Layout We will get the printed form layout we created. To do this we use the built-in function GetLayout(<ИмяМакета>).
Layout = GetLayout("Layout");
We will convert all areas of the layout into variables. To do this we use the layout method GetArea(<ИмяОбласти>) .
HeaderArea = Layout.GetArea("Header"); AreaData = Layout.GetArea("Data"); AreaFooter = Layout.GetArea("Footer");
Outputting the header of a printed form into a spreadsheet document
All necessary variables are initialized. Let's start filling and displaying the layout areas in a spreadsheet document. First of all, let's fill in the title of the printable form; for this we need to pass in the parameter Title Text, which we created in the layout, the text we need. To fill in the parameter values for the layout area, there is a special collection called - Options. From which through “.” you can get any parameter. In the header text we will transfer the text: “Printed form”, as well as the document number.
Header Area.Parameters.TitleText = "Print form"+LinkToObject.Number;
We will fill in the remaining parameters of the header in a similar way; we will obtain all the necessary values for them from the details Object Reference, which contains a link to the document to be printed.
HeaderArea.Parameters.Organization = LinkToObject.Organization; HeaderArea.Parameters.Account = LinkToObject.Account; HeaderArea.Parameters.ReceiptDate = ObjectLink.Date; Header Area.Parameters.Counterparty Agreement = LinkToObject.Counterparty Agreement;
All parameters of the header are filled in, we will display it in the spreadsheet document we created, for this we use the method Output(<Область>) .
TabDoc.Output(HeaderArea);
Writing a request for a printed handicap
Let's start filling and drawing out the area Data. Creating a 1C printed form also involves writing a query; we need it to obtain tabular data Goods and prices Nomenclatures for the current date we will use Request. The 1C 8 query language is similar to SQL, or rather practically copies the capabilities of its SELECT operator, but the entire query is written in Russian. Therefore, if you are at least vaguely familiar with SQL, then you will easily understand the 1C 8 query language.
In this printed form, the request will be quite simple and many will say that it would be possible to do without it, but knowledge of the query language and the ability to use it competently is one of the main skills of a 1C programmer. Queries allow you to obtain complex data samples using fewer resources, and the query text is much easier to understand than program code written without using a query (or with minimal use of it). In addition, 1C 8 has a very good query designer that allows you to interactively assemble a query from the necessary tables.
Let's create a variable that will contain the request.
Request = New Request;
We will compose the request text using the request constructor. To begin with, let's write:
Request.Text = "";
Place the mouse cursor between the quotes and press the right mouse button. In the context menu that opens, select the item Request constructor, it will help us a lot in creating a 1C printing form. After this, the query designer window will open; it contains many tabs, but for our query we will only need four: “Tables and Fields”, “Relations”, “Conditions”, “Joins / Aliases”.

For our query we will need two tables: table part Goods document Receipt of goods and services and a snapshot of the latest information on the current date of the register Item prices.
On the left side of the designer window we find the column Database. It contains a tree of all metadata objects, let's find the ones we need. To do this, let's open the thread Documentation and find the document Receipt of Goods and Services, let's open it and find the tabular part Goods, drag it into the column of the query designer Tables. You can drag in three ways: by dragging, by double-clicking on the table, or by selecting it and clicking the “>” button. Let's open the thread Information Registers and find a table there PricesNomenclature.ShortcutLatest, also drag it into the column Tables. These two tables are enough for our query.
Let's select the fields we need from the resulting tables. To do this, in the column Tables let's open the table and find the fields: Nomenclature, Amount, Price, Quantity and drag them to the third column of the constructor - Fields. Let's expand the table , let's find the field Price and also drag it to Fields.

The structure of the tables and fields of our request is ready, now let’s move on to the conditions. We need the tabular data Goods were not taken from all receipts, but only from the one that we print. To do this, we will impose a condition on the table Receipt of GoodsServicesGoods. Let's go to the “Conditions” tab of the query designer. In a collumn Fields the tables we selected earlier are located, for the condition we will need a field Link from the table Receipt of Goods and Services Goods, Let's drag it into the Conditions window.
In 1C queries you can use parameters; they are needed to transfer data to the request. For example, if we want to limit the selection of documents to a specific document, then we can use a parameter to pass a link to this document to the request and use this parameter in the condition. This is exactly what we will do in our request.
After the window Conditions we added a field Link, the query designer itself will create a parameter with the same name and place it after the “=” sign. This parameter can be renamed if desired. In the request text, the parameters are marked with the “&” sign, but in this case this is not necessary, since it is assumed that the second part of the condition contains a parameter, you just need to remember this. How to pass a value to a 1C request parameter will be discussed below.

Since in the request we are using not a full table of product prices, but a virtual one (a slice of the latter in this case), we need to set the conditions for the formation of this virtual table, in our case this is the cut-off date and the condition for the type of prices (prices that have a strictly defined price type is the one specified in the receipt document that we print).
To fill in the parameters of the virtual table, go to the tab Tables and fields query constructor, in the column Tables select the table PricesNomenclatureCuttingLatest and press the button Virtual Table Options, located at the top. In the window that opens, in the field Period you should set a parameter to which the date on which the price cut will be made will be passed. In our case, this will be the current date (that is, today), so we will call the parameter “&CurrentDate”. In the conditions field we will write the conditions for the price type, we will also pass it in the parameter, which we will call “&TypePrice”. The resulting condition will look like this (where TypePrice- register measurement Item prices):
PriceType = &PriceType
The virtual table parameters are filled in, click the button OK.

Now that we have limited the selection to only the document we need, let's create connections between the query tables. If this is not done, then the prices from the PricesNomenclatureSliceLast table will not be associated with the item from the receipt. Let's go to the tab Connections query designer. Let's create a connection across the field Nomenclature between our two tables. To do this, press the button Add, in field Table 1 select a table Receipt of GoodsServicesGoods, and in the field Table 2 - PricesNomenclatureSliceLast. In the communication conditions, select the fields Nomenclature from both tables.
It should also be noted that in the query selection we need to get all the rows from the tab part Goods and prices only if they are available on the current date for the document price type. Thus, the tabular data Goods are mandatory, but price breakdown data is not available. Therefore, in the relationships between these tables it is necessary to use the so-called LEFT JOIN, and the left (or required) table will be Receipt of GoodsServicesGoods, and the right (or optional) PriceNomenclatureSliceLast. In order for the left join of query tables to work as I described above, you need to check the box All after the field Table 1.

The request is almost ready, all that remains is to work a little on the field aliases. Let's go to the bookmark Unions/Aliases and set an alias for the field PricesNomenclature Slice Latest.Price. The nickname name will be - PriceAsToday, it is needed so that the names of the query selection fields and the names of the parameters in the printed form layout match.

The work in the query designer is now complete, click OK. After the designer window closes, you will see that the line with the request text is filled in and looks like this:
Request.Text = "SELECT | Receipt of GoodsServicesProducts.Nomenclature, | Receipt of GoodsServicesProducts.Amount, | Receipt of GoodsServicesProducts.Price, | Receipt of GoodsServicesProducts.Quantity, | PricesNomenclature Slice of Latest.Price AS PriceToday | FROM | Document. Receipt of GoodsServices.Goods AS Receipt ProductsServicesProducts | LEFT CONNECTION RegisterInformation.PricesNomenclature.SliceLast (| &CurrentDate, PriceType = &PriceType) AS PricesNomenclatureSliceLast | ON Receipt of GoodsServicesProducts.Nomenclature |
Executing the request
Let's pass the necessary parameters to the request; for this we will use the request method SetParameter(<ИмяПараметра>,<Значение>).
To get the current date, use the built-in function The current date(), it returns the computer's date and time.
Let's run a query to get a sample with the data we need. To do this, first use the request method Run(), and then the method Choose().
Select = Query.Run().Select();
Filling out the printed form table
As a result, in the variable Sample will contain a selection of query results, you can navigate through it using the method Next(), and to go through the whole thing you need a loop Bye. The design will be as follows:
While Select.Next() Loop EndLoop;
It is in this loop that we will fill and display the layout area Data. But first, let's initialize two variables of numeric type. In them we will collect the totals by quantity and amount that we need to display in the area Basement.
TotalSum = 0; TotalQuantity = 0;
Inside the loop we will fill the area Data data from the current selection element into variables TotalAmount And TotalQuantity add sum and quantity values, and finally display the area in a spreadsheet document using the method already familiar to us Output(). Since the names of the fields of our request completely coincide with the names of the area parameters Data, then to fill we will use the built-in procedure FillPropertyValues(<Приемник>, <Источник>), which copies property values<Источника>to properties<Приемника>.
While Selection.Next() Loop FillPropertyValues(AreaData.Parameters,Selection);
TotalSum = TotalSum + Sample.Sum;
TotalQuantity = TotalQuantity + Sample.Quantity; Basement TabDoc.Output(AreaData); EndCycle;
Outputting the footer of a printed form into a spreadsheet document
It remains to fill and display the last area of the layout - . We have already prepared the data for filling, filling and withdrawal are carried out according to the same scheme. AreaFooter.Parameters.TotalQuantity = TotalQuantity; AreaFooter.Parameters.TotalSum = TotalSum; TabDoc.Output(AreaFooter);
The spreadsheet document is completely filled out; all that remains is to display it on the screen so that the user can view the printed form and print it if necessary. But in typical 1C 8 configurations, the procedures of special modules are responsible for the output of external printed forms. Therefore, it is enough to return from the function
Seal() . We have already prepared the data for filling, filling and withdrawal are carried out according to the same scheme. completed spreadsheet document.
Return TabDoc;
When connecting an external printing form to the database, the system does not automatically determine which document or reference book the printing form is intended for; you have to select it manually. And if another person wrote the printed form, and you are only tasked with connecting it, then the choice may become ambiguous. In order to avoid such problems, in all external printed forms it is necessary to create a layout with auto-registration parameters. If it is created and correctly formatted, the system automatically determines which document or reference book the printed form is intended for.
It is done as follows:
- In external processing we create a new layout. We call it “Settings_Auto-Registration” (it’s important not to make a mistake!).
- In the first cell of the layout we write Documentation.(or Directories.) and the name of the document to which you need to connect the printed form.

Connecting an external printing form to the base
- Start 1C 8 in mode Company;
- Go to menu Service -> Additional reports and processing -> Additional external printed forms;
- Click the button Add;
- In the window that opens, click the icon Replace external processing file;
- If you have created auto-registration parameters, then we agree to use them;
- If you have not created auto-registration parameters, then in the tabular section Printing plate accessory add the required document or reference book;
- Press the button OK.

After this, the external printing form will be available in the menu Seal document Receipt of goods and services. The creation of the 1C printed form can now be considered complete.
External printed forms for a regular application (for the configuration Enterprise Accounting 2.0, Salary and Human Resources Management 2.5, Trade Management 10.3, etc.) are created quite simply compared to external printed forms for a managed application.
Why create external printing forms?
The advantage of an external printed form compared to a conventional one is that it allows you to avoid changing the configuration of the information base. This means that the process of subsequent configuration updates will not be complicated. In addition, external printed forms, along with external processing, are the only option for expanding the functionality of basic versions of 1C configurations, which cannot be changed at all.
And one last thing: external printed forms are easier to replicate, because they are a separate file that can be quickly connected to the infobase.
How to create an external printing form
Let's look at the process of creating an external 1C printed form step by step:
- We create external processing. To do this, select the menu item in the configurator File - New... And in the dialog box that opens - External processing.
- Create an external processing attribute with the name Object Reference. Attribute type is a link to a directory or document for which an external printed form is being created. The same form can be used for several types of objects, in this case the attribute data type Object Reference must be composite.
- In the object module we create an export function with the name Seal, which should return a ready-made printed spreadsheet document.
It often happens that you need to slightly adjust the layout of an existing printed form and make it external. For example, add the organization’s seal and the manager’s signature to the layout.
Creating an external printing form based on a standard one with minor changes
Let's consider this procedure using the example of creating an external printed form of a universal transfer document for a document Sales of goods and services 1C: Accounting. It will differ from the standard printed form by the presence of the organization's seal.
- Creating external processing with props Object Reference, data type - DocumentLink. Sales of Goods and Services.
- We find the layout of the standard UPD printed form (it is located in the general layouts) and copy (drag) it into the external processing window. Layouts of other printed forms may be located in the documents or reference books themselves.
- We make the necessary changes to the copied layout of the printed form.
- We find the function responsible for generating the printed form. This function should return the generated spreadsheet document. Copy its contents to the export function . We have already prepared the data for filling, filling and withdrawal are carried out according to the same scheme. in the external processing object module.
In our case this is the function PrintUniversalTransferDocument() Export from document object module Sales of goods and services.
If the layout changes were significant (areas and/or parameters changed), then appropriate adjustments must be made to the print function. - We are trying to save external processing. However, you will likely receive error messages that indicate that some of the procedures and functions called by the print function are missing. These functions and procedures must be found in the source document and also copied into the external processing object module. Or adjust the link if the original function or procedure is export.
- (not necessary). To test an external printing form, it is convenient to make a form on which to place the props Object Reference. Button Execute must call a procedure . We have already prepared the data for filling, filling and withdrawal are carried out according to the same scheme. from the object module. To do this, the button click event is given a procedure:
Let's consider writing the simplest printed form in 1s 8.1 - 8.2 using configuration example Enterprise accounting 2.0. Let's say you need to write an external printed form for a document: display the basic data of the document, as well as from the tabular part Goods: nomenclature, price, quantity and amount.
You can download the resulting example from .
In the configurator 1C Enterprises 8 create external processing ( File->New->External Processing), set the name, create the required details for the external printed form Object Reference with type DocumentLink. Sales of Goods and Services.
Creating a printed form layout
Add a new one layout, leave the layout type spreadsheet document. We create three areas on the layout: Header, Data And Basement. This can be done by selecting the required number of lines and clicking menu Table->Names->Assign name (Ctrl+Shift+N).
After this, we begin to place text and parameters in the areas. We'll put it in the header name of the printed form, document number And organization, and also draw the borders of the table header and write the names of the columns. When creating a parameter in the cell properties, on the Layout tab you should set the property Filling in meaning Parameter.
In area Data let's create parameters for displaying rows in the tabular section( Nomenclature, price etc.), and in the area Basement for totals by quantity and amount.

Programming
Let's go to the printing form object module Actions->Open object module.

Let's create an export function there that is mandatory for printed forms. . We have already prepared the data for filling, filling and withdrawal are carried out according to the same scheme..
Function Print () Export EndFunctionIn the function we will create a variable for spreadsheet document, into which the printed form will be output, we get layout And layout areas.
TabDoc = new TabularDocument; Layout = GetLayout("Layout" ); HeaderArea = Layout.GetArea("Header" ); AreaData = Layout.GetArea("Data" ); AreaFooter = Layout.GetArea("Footer" );
Let's fill in the parameters hats and bring it to spreadsheet document.
HeaderArea.Parameters.HeaderText = +LinkToObject.Number; HeaderArea.Parameters.Organization = LinkToObject.Organization; TabDoc.Output(HeaderArea);
To get table rows Goods we use the request.
Request = new Request; Request.SetParameter("Link", ObjectLink); Query.Text = "SELECT | Sales of Goods and Services Goods. Nomenclature, | Sales of Goods and Services Goods. Amount, | Sales of Goods and Services Goods. Price, | Sales of Goods and Services Goods. Quantity|FROM | Document. Sales of Goods and Services. Goods HOW to Sale of Goods and Services Goods|WHERE | Sales of Goods and Services Goods. Link = &Link";
We pass the details to the request parameter Object Reference, to indicate in the condition WHERE, that we need data only from the document from which we derive the printed form. To get a sample query, we first execute it and then select the rows.
Select = Query.Run().Select();
Next in the loop we fill in the area parameters Data for each line of the document sample and display them in spreadsheet document. We also calculate the total values in the loop quantities And amounts. We will not fill in each parameter separately, but use the procedure Fill inPropertyValues((<Приемник>, <Источник>) from global context, it copies property values <Источника> to properties <Приемника> . Matching is done by property names. You can read more about this in syntax assistant 1C Enterprise 8.
TotalSum = 0 ; TotalQuantity = 0 ; While Selection.Next() Loop FillPropertyValues(AreaData.Parameters,Selection);
TotalSum = TotalSum + Sample.Sum; Basement.
Outputting the footer of a printed form into a spreadsheet document
TotalQuantity = TotalQuantity + Sample.Quantity; . We have already prepared the data for filling, filling and withdrawal are carried out according to the same scheme..
TabDoc.Output(AreaData); EndCycle ;Fill and display the area Returning the completed spreadsheet document from the function return TabDoc; If you are using one of the standard configurations, then after returning the spreadsheet document.
1C
will display the printed form on the screen. You can also use the spreadsheet method for output. Show() 5. Connecting a printed form to a document IN standard configurations 1C 8 There is a directory for registering external printed forms.

ExternalProcessing

. To connect, go to the menu in enterprise mode Sales of goods and services Service->Additional reports and processing->Additional external printed forms


Add a new directory element, load the printed form from disk and select the document type.
Now in the document A new printable will appear. Auto-registration of printed form To ensure that when connecting a printing form you do not need to select the document type manually, you can configure auto-registration . To do this, add a new layout and call it<Наименование документа> Settings_Auto-registration (this is the only way) and in its first cell we write<Наименование справочника> ).

Documentation. (or.

Directories.
Now, when connecting a printing form, we will be asked to use auto-registration parametersSandbox
tough guy
August 23, 2011 at 10:22 am
To generate this report, you need one directory “Employees” with the details “Date of Birth”, “Position”. Let the employee's last name, first name and patronymic be stored together in one default field - “Name”. To indicate the position of an employee, there is another simple “Positions” directory with default fields. The structure of the necessary reference books is shown in the figure below.

Now let's create a new report and call it “Employee List”. Let's go to the "Layouts" tab and create a new layout of the "TabularDocument" type.
A blank spreadsheet document will open in front of us, ready for use. Now we need to present the required report in the form of a layout.
To do this, first copy the source report into a blank spreadsheet document, i.e. to the report layout. You'll get something like this:

Let's put the layout in order - we'll align the headings to the center, set the table to display borders, and delete all data from the table except the first record. We will have it as a sample.
Let's divide the finished report into areas as follows:

For each area, you must assign a corresponding name; to do this, you need to select the desired area (in this case, all areas are groups of rows) and click on the button with the icon, or the key combination Ctrl+Shift+N. In the window that appears, you need to enter the name of this area. Let's name the areas as they are indicated in the figure.
Now those table cells in which data from the infobase should be displayed must be designated as containing a template. To do this, select this field and select “Properties” in the context menu (right mouse button). In the “Fill” cell property drop-down list, you must select “Template” (example in the figure below).

After this, if an expression in square brackets appears in the cell text, it will be perceived by the 1C system as a parameter. For example, if the cell text is as follows:
My name is [MyName],
Then to display the text “My name is Ivan” the parameter is enough "My name" assign the value "Ivan".
In our case, the template will be the report output date, as well as all columns from the row containing the employee’s data. As a result, after all the manipulations, the report layout will look like this:

This completes the creation of the layout. Now you need to programmatically generate a report from the generated areas and display it.
Tags: 1C 8, layout, reports, layouts
This article is not subject to comment because its author is not yet
New articles
- Presentation "efficiency of heat engines"
- Publications 1c creation of a printed form layout
- Predicting the Geometric Shape of Molecules
- Implementation of CRM Bitrix24 CRM Bitrix: general information
- Presentation - Russian folk tale “Teremok”
- Structure and function of the heart
- Stars: main characters What is a star?
- When is it permissible to transfer to another job without the employee’s consent? The employer transfers to another job without consent.
- What is a sanitary doctor
- The concept of flexible work hours in an employment contract
Popular articles
- Name of arts and crafts club, work program, development
- "1s:toir" as a tool for planning and carrying out maintenance and repairs Accounting for equipment conditions
- How should a seal appear on a document?
- Determining staffing needs
- Reorganization of non-profit organizations
- Customs declarant Profession declarant pros and cons
- How does a nuclear power plant work?
- What is meant by business valuation?
- Acquisitions and mergers of companies
- What's the point of self-development if we're all going to die in the end anyway?